I've had quite a few messages asking what had happened and where I was, so I thought I should apologise for disappearing and explain what's happening in my crazy word this past year.
Wow what a year 2015 was! I had one of the best and one of the hardest years of my life all rolled up in one.
This past year I welcomed another member into my family, my step-daughter Taylah came to live with us. After no contact her whole life, we were delighted when Taylah made contact and even more excited when she decided to move down from Queensland to live with us. As happy as we are to have her with us, it was a challenge to get used to another Adult (teenager) living in our home and only now are we finally getting used our new 'normal'.
We moved house again this past year. After I accidentally flooded our last house (the washing machine overflowed oops!!) we had to pull up some carpet and found that the house was full of Black Mould and termites. We found that this was the cause of our sons Asthma and so it was time to move... again... The joys of renting :(
The benefit of moving though was that we found an amazing (very old) home that fills all our needs completely!
Our new home is very small, but it has a granny flat (my new studio and bedroom for Taylah) and a swimming pool! Woo Hoo! The kids just love being able to go for a swim in their own backyard.
This home reminds me of the holiday homes we used to visit when I was a child, so I kind of feel like I'm on holidays all the time. lol sort of... As much as I love big bright modern homes, I must admit that a little cottage with all that character is definitely more my style.
The highlight of my year was signing on to be the new ambassador of Husqvarna Viking Sewing Machines (my dream roll). I did a huge amount of travel late last year with the Blessington crew (the parent company for HV, Handi Quilter and many more in Australia). I cannot explain how amazing the team is! I feel like I'm part of a whole new family. They have welcomed me with open arms and I absolutely love being part of the team!
I guess the hardest part of the past 12 months was that my health was not so good! I was feeling extremely run down and it wasn't until I casually mentioned one of my symptoms to a trainee Doctor (while we were waiting for the Doctor to arrive) that I finally got to understand why!
I have had so many little symptoms over the years that on their own were not really worth mentioning, but when the student doctor started asking questions the flood gates opened and we are thankfully almost to the bottom of all my problems! I have Hypothyroidism, a failing kidney (we've gotten that under control) and another problem that I can't spell lol!
Basically the Thyroid problem is to blame for most of my problems. It even explains why I loose my voice at the end of almost every show/event I've ever been part of! Now that we are aware of it, hopefully life is going to get easier.
But onto the happy news, I am so excited about whats to come this year! Husqvarna Viking have launched a brand new machine and trust me it is incredible! The Epic is the most amazing machine I have ever seen! It is the kind of machine that does everything I could ever dream of, and then more! I can't wait to get my hands on one and just play. The technology in this little beauty is mind blowing! Ohh and it takes a 30% bigger bobbin! Woo Hoo!
My Handi Quilter videos will also make a comeback this year, so look out for those in the very near future. Handi Quilter have just launched a new machine too, the Simply Sixteen with the Little Foot frame is the perfect option for those who want a 'long arm machine' but don't have the space for one.
I hope you had a lovely holiday season, I had the best time with my family! We took a cruise to New Zealand for 11 nights.
It was so nice to be able to have some time with the kids that was just about them. They had the best time and are constantly saying, I want to go back on the ship. I guess we better start saving again :)
I wanted to share this picture because I'm so proud of the kids don't they look gorgeous! Molly (my eldest) was a little sad because her brother Jack accidentally stood on her foot just before we took the pictures, but she tried to give as big a smile as she could hehehe.
My 3 girls are wearing dresses I made. I also made my dress and my sons tie as well.... I didn't make anything for my hubby, but I did have to repair his favourite Mickey Mouse tie, so I guess that counts right lol.
So thats it, thats my 2015... I'm so excited to see what the new year has in store for us all, bring on 2016!
So this is the most exciting news I have had to share in well.... forever!
I have been asked (and only took about 2 nano seconds to agree) to be the new National Ambassador for Husqvarna Viking Sewing Machines!
I have been a Husqvarna Viking girl my whole life!
My mum was a Husqvarna Viking Dealer and she won a 2nd place at Houston for machine embroidery (she made her piece on a Designer one) so I have always been around Husqvarna Viking Sewing Machines.
As soon as I was able to afford my own machine I bought a Sapphire 875. It wasn't long before I also bought a Huskylock S21 overlocker (serger).
The thing I love most about Husqvarna Viking is that they are not followers. Their machines are always ahead of the pack with the latest technology! They really do offer the best features for a really reasonable price! There is a HV machine for every type of sewer and budget.
I can't wait to share my HV journey with you!
I will be at the Sydney Craft and Quilt Fair on the Husqvarna Viking stand, I really hope you will come along and visit with me! I would love to show you what Husqvarna has to offer. I'll be on the stand on the 18th, 19th and 20th and will have a talk each of those days at 11.30 and 1.30pm.
I will also be making some new videos to share with you too.
Hugs Paula
PS. I will still be a HQ Sweet Sixteen girl too. I will be working with Blessington Pty Ltd who are the company that bring lots of amazing brands to Australia. Husqvarna Viking and Handi Quilter are just two of them.
Here is the 4th part of the Table runner project. This week we finish off the Free Motion quilting with a little help from a ruler.
If you can't see the video above, here is the link to watch it on YouTube: https://www.youtube.com/watch?v=orwI6NZg8EM&feature=youtu.be
In case you missed them here is the first 3 parts of this project :)
Part 1
https://www.youtube.com/watch?v=IOQyYYqQSTw
Part 2
https://www.youtube.com/watch?v=KTAyqxN0uKo
and Part 3
https://www.youtube.com/watch?v=1KhMcOyjK1g
I hope you have enjoyed the Sweet Sixteen Sunday videos this year, its been a huge learning curve for me, but I have really enjoyed making them for you!
Next year I have lots of plans to make the videos bigger and better, so I hope you have a fantastic break and I will be back with more Sweet Sundays at the end of the School Holidays 2015.
While I was filming this 3rd part I realised that there was so much potential for fun quilting that I ran out of time, so this week I did a few different designs and next week we will do one more and finish off the table runner.
I hope you enjoy this weeks video!
Hugs Paula
Here's the link if you can't view it above: https://www.youtube.com/watch?v=1KhMcOyjK1g
After a few weeks break I got back into making a video this week.
I very happily received my new 'Accuquilt Go' this past week and immediately started playing! What a fantastic tool this is! I am totally in love with it already and we have only had a few weeks together.
This week is the start of a 3 week project. This week we do some quilt as you go work on the Sweet.
I hope you will join me and make up this project! It's super quick and easy, especially with the use of the Accuquilt Go. It's a perfect last minute gift idea and is easily constructed in a weekend.
Here's the direct link if your having trouble viewing it: http://youtu.be/IOQyYYqQSTw
This week I wanted to show you the Couching Feet from Handi Quilter.
Now let me say first of all, I'm not an expert in this technique, but it is super fun!! I have included some inspiration pictures from the true expert Helen Godden to show you what is possible with the Couching Feet.
You can find Helen on Facebook (send her a friend request) or on her website www.helengodden.com
Have a Sweet Sunday!
Hugs Paula
PS. If you can't see the embedded video above, just click here: http://youtu.be/LPbdMKzdbHM
I've been wanting to build up a collection of videos that show you exactly how to make a quilt from start to finish with the HQ Sweet Sixteen.
This week is the final step in every quilt, The Binding.
I do my bindings a bit differently to most, so I hope you find this technique quicker and easier.
I forgot to mention in the video that when you are hand stitching the binding down, you can also hand stitch that final 'tucked' section closed. That way your final join will look exactly like the rest.
Have fun and I'll see you next week,
Hugs Paula
PS. If there is anything you would like me to demo, please leave me a comment.... I'm running out of ideas ;)
Link to my book as mentioned in the video: http://www.paulastormdesigns.com/#!patterns-shop/ciaa
It has inspired many a cranky word in my house, thats for sure!
Today I wanted to do a video that talks about what Tension is and how to fix it. Adjusting the tension on your Sweet Sixteen is a little different to a regular sewing machine and so it can be a bit tricky to get your settings just right.
So after the 200th request (not really, but there was a lot) here is a video all about how to set up the Tension on your Handi Quilter Sweet Sixteen.
I hope this takes some of the frustration out of setting your tension up!
Hugs Paula
If you can't the see video, just click here to go straight to YouTube to watch it: https://www.youtube.com/watch?v=CmHaLLmGfjc&feature=youtu.be
This week I had a huge amount of trouble with my camera. I was hoping to record a bit more video for you, but it just wasn't to be...
Anyway, this week I'm using the Wave F ruler from Handi Quilter to create a cute motif of a flower.
There is so much more that you can do with this ruler, so sit back with a culpa and I hope you find this video helpful!
A few of you awesome subscribers, have had trouble viewing the video in your email, so here is the direct link to this weeks video. http://youtu.be/bvpyoNkK09w
This week I wanted to show you how I use rulers with my free motion quilting, so I have used a wave ruler from Handi Quilter to create a stem and then I did some free motion feathers.
I love how this creates a uniform and even look to my feathers but they still look free and flowy... does that make sense... because I do the feathers free motion, I don't have the rigid look of the stencil.
So grab a cuppa and I hope you enjoy this weeks HQ Sweet Sixteen.
Lets face it, Free Motion Quilting isn't easy! If it was easy, everyone would be an expert....
That doesn't mean you can't do it though!
I've been thinking about the top 5 things that have helped me, and I thought maybe these top tips might just help you too.
Tip 1:
You have the permission to slow down!
When I first started free motion quilting I thought I had to have the machine going at a million miles an hour to get nice stitches.... After all, all the best quilters go FAST! Guess what, the second I decided that I just couldn't go fast anymore, my quilting improved.
I found that my brain just couldn't keep up... I was getting flustered because I didn't know where I was going next.
Because I was so tense and worried about keeping up with the machine, my quilting was awful! So slow down and take your time, this will give you more thinking time to work out where you need to go next.
Tip 2:
Forget about your stitch length for now!
Everyone wants nice even stitches on their quilts, but when you first start quilting your stitches will not be even! I study quilts (thats just how i roll) and I have looked at award winning quilts, yes even quilts that win in Houston and they are not perfect! As my favourite Quilter Angela Walters says, 'You will not become a better quilter from unpicking!'
Give yourself permission to not be perfect!
Tip 3:
Don't look at your needle!
This was the very first thing my mum told me when I started sewing. It applies to all types of sewing, not just quilting.
When you go out driving next time, think about where you are looking when your driving your car. When you're turning out of your driveway onto the road, are you looking in front of you or are you looking out onto the road where you are going to end up?
When your turning into a parking spot at the supermarket are you looking at your bonnet or are you looking into the spot where your car is going?
It takes practice, but when you stop looking at the needle you will get more comfortable and less flustered.
Looking at the needle will make your eyes get blurry and you will tire out much more quickly.
Tip 4:
Draw, Draw, Draw, Draw, Draw!
Getting out some paper or even a white board or black board and draw! The more you draw a particular design, the more it gets into your whole system and the easier you will find it is to quilt it.
I like to sit down and pick just one design, then I try to draw it in as many different ways as I can. This could be as easy as a half circle. I like to keep all my drawings because its a timeline of how much I have improved, but its also my own little idea library. Even if the drawings aren't perfect, it might just spark a new idea when I need it. I can't tell you how much this one thing has changed my quilting! Start doodling and I guarantee your quilting will improve!
Tip 5:
Stippling isn't easy!
When you really think about it, stippling isn't something that we have ever drawn growing up... it's not something that we are used to doing. Growing up we draw tonnes of circles, triangles, stars and hearts, but I don't ever remember drawing a meandering line that doesn't cross it's own lines...
So the stipple is not something thats going to come easy to you!
Why not try something else like a heart with a wavy line that joins them, or just some big circles. You will be much more comfortable with these shapes because you have been drawing them since you were in kindergarten!
Bonus Tip!
Give yourself permission to waste some fabric!
You will never improve without practice, that's just an unfortunate fact of life. You will also not improve if you use crappy, cheap fabric to practice on. Cheap fabrics just don't tend to slide under the needle as easily as better quality fabric, so get to your quilt shop and buy some of that discounted ugly fabric that none else wants to buy (because its ugly and therefore cheap) or get into your stash and find some fabric that you know you will never use and practice, practice, practice! If the ugly design is distracting you, turn it over and quilt the (not quite as ugly) back of the fabric.
I hope you find these tips handy!
See you next week for another Handi Quilter Sweet Sixteen Sunday, brought to you by Handi Quilter Australia.
Applique Design by 'Don't Look Now' Quilting by Paula Storm
You know the feeling, your totally elated because you just finished your quilt top, but then you remember you now have to baste it and the thought of all those pins and sore aching fingers make you put your beautiful quilt top away for 'later'.
That was exactly what happen with this quilt top. I made it probably 2 ½ years ago. This was made so long ago that my style of quilt making has totally changed! Even my husband looked at it and said... "Thats a bit old fashioned for you isn't it!" From someone who has absolutely no interest in quilts I took that as a sign that I really should have finished this quilt a loooong time ago. hehehe
Ohh well, it was meant to be, because now I have a quilt that I have no emotional attachment too. This means I can play and practice different quilting techniques without worrying about the result having to be just right!
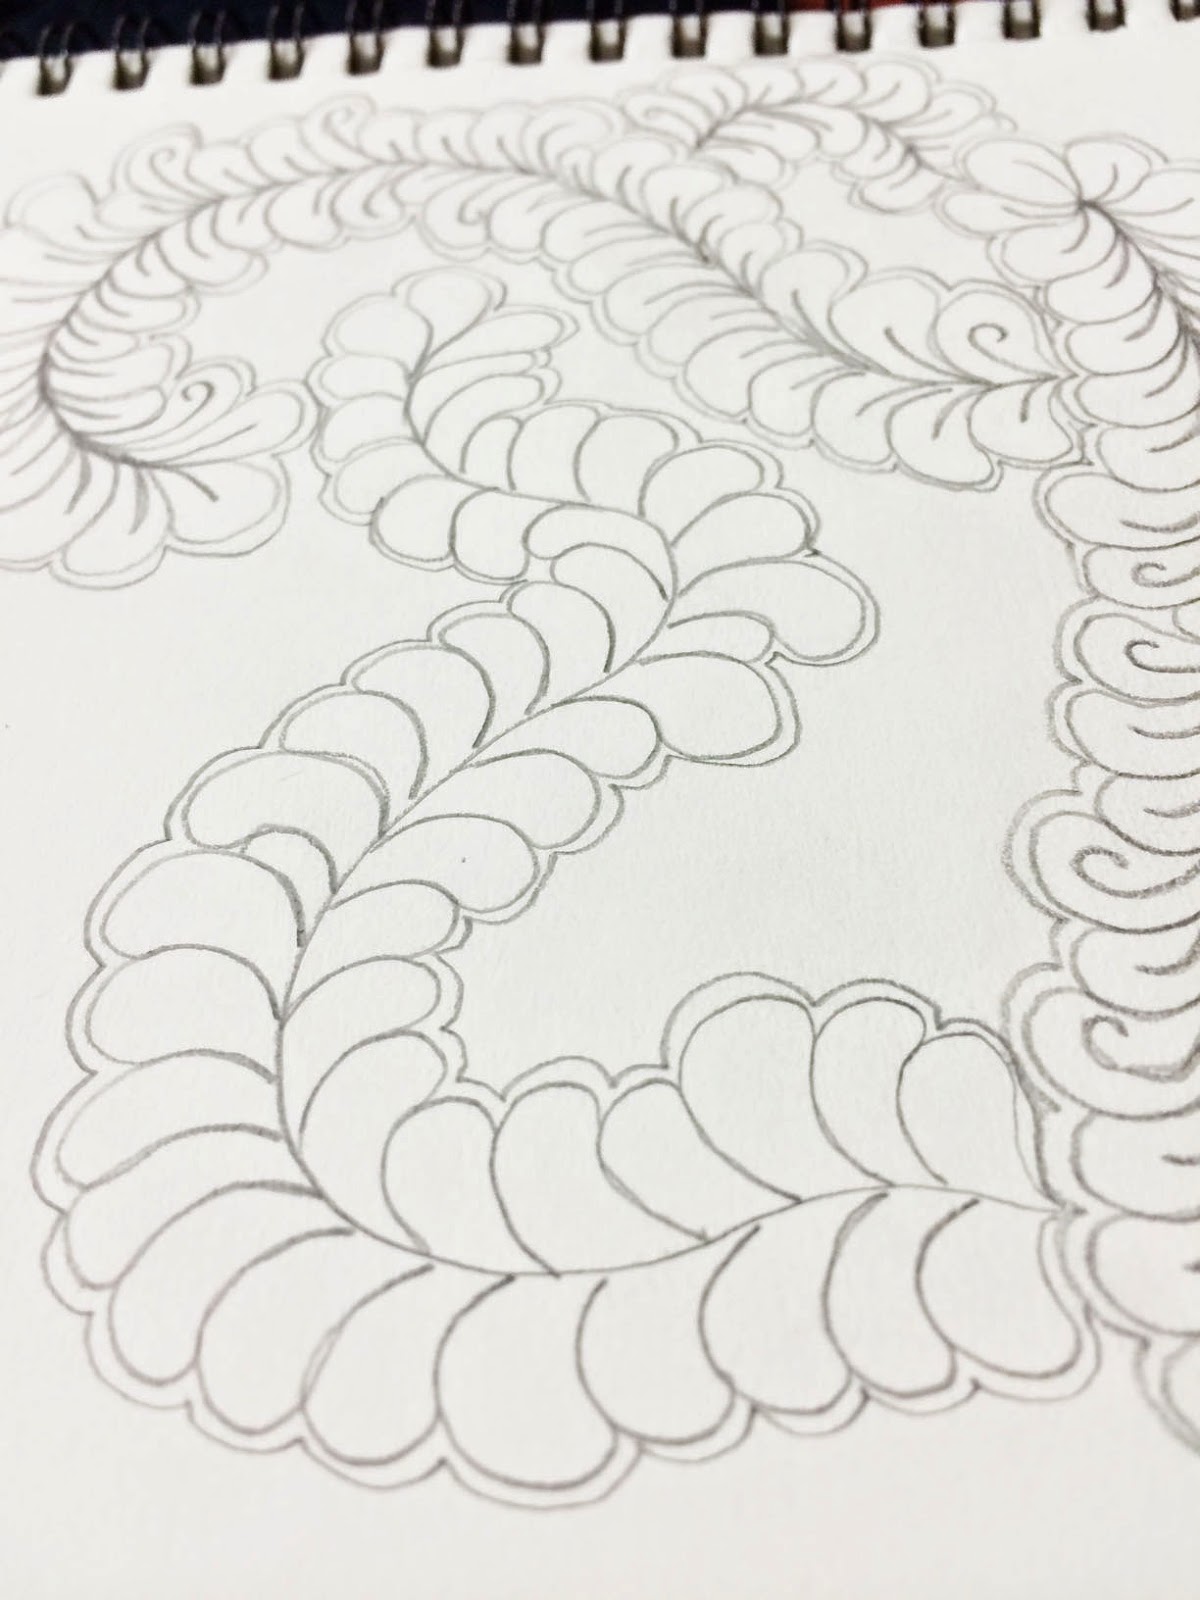
As always when I'm stuck for ideas on how to quilt a project, I pull out a few simple tools and start playing. I had the best night last night! I grabbed some paper and a pencil and just one template. I feel like having a pile of templates gets me distracted and I jump from template to template without pushing myself to come up with different designs that work.
Last night I chose the HQ oval template and started drawing some 6 inch squares (actually they were a bit smaller so I could fit 2 on a page). I started by drawing the oval in the middle of the block and then tried to fill up the block.
First I filled the square up with regular feathers.
Then I tried changing the top of the feathers to an almost heart shape...
Then I tried using the full oval shape and just kept adding more and more ovals. This was looking quite messy until I started filling some of the areas with fills. I love how this one turned out!
My sister saw the 'heart' shaped feathers and thought they kind of looked like hibiscus flower petals. She challenged me to draw a hibiscus flower design.
I drew the first one on the left looking at flowers on google images and then I went to town just playing with my own imagination. I love how the echo and background fill made such a huge difference!
Anyway I got distracted, back to basting :)
I used to hate, and I mean really 'Hate' basting. I was told I had to stick my backing to a table (or floor or wall), lay the batting on top and then pin all the layers together. There's many reasons that I disliked doing this. First of all, I usually needed help or my fingers would be so sore I wouldn't be able to quilt my quilt for a week after!
I have a bad knee which meant I couldn't get down on the floor, so I had to work on my dining table and I kept scratching my table top with all those pins.
Another reason is all those pins made my quilt top so heavy that the drag was terrible! It's hard enough quilting a quilt on a small sewing machine, add in all the extra weight of 2000 pins and it just makes everything harder.
The main reason though is when you pin baste a quilt you are only holding together the layers where there is a pin! Sounds silly, but unless you put a pin in every single inch, there is just no way I could get a quilt pin basted that eliminated all the shifting.
Then I discovered Basting spray! (can you hear the angels singing!) ;)
I just want to start by saying, not all basting sprays are great, some are pretty awful, but I have found that the 101 quilt basting spray by Helmers is awesome! You only need a small amount and it sticks all the layers together over the entire quilt surface (not just where the pins are) and pretty much eliminates the shifting.
This week for HQ Sweet Sixteen sunday I wanted to create a video that shows you how I baste a full size quilt. I use this technique for all my quilts, even king size quilts can be basted on an ironing board!! Grab a cuppa and I hope you find this video helpful.
Hugs Paula
Tools used include:
Helmar 101 Basting Spray
Matilda's own Wool/cotton/polyester batting
HQ Sweet Sixteen Basting feature
I've been a bit under the weather this week, so I wasn't up to do a full video. I thought though I could share a little bit about how I have my Sweet 16 set up.
The Sweet is in my lounge room. I was a bit worried about it to be honest because I thought this would really annoy my family while they watch TV.
I was honestly very surprised though because it is really pretty quiet and even hubby doesn't complain about the noise! (thats a minor miracle)
See you next week with the start of a new series of videos where I will be working on a full size quilt!
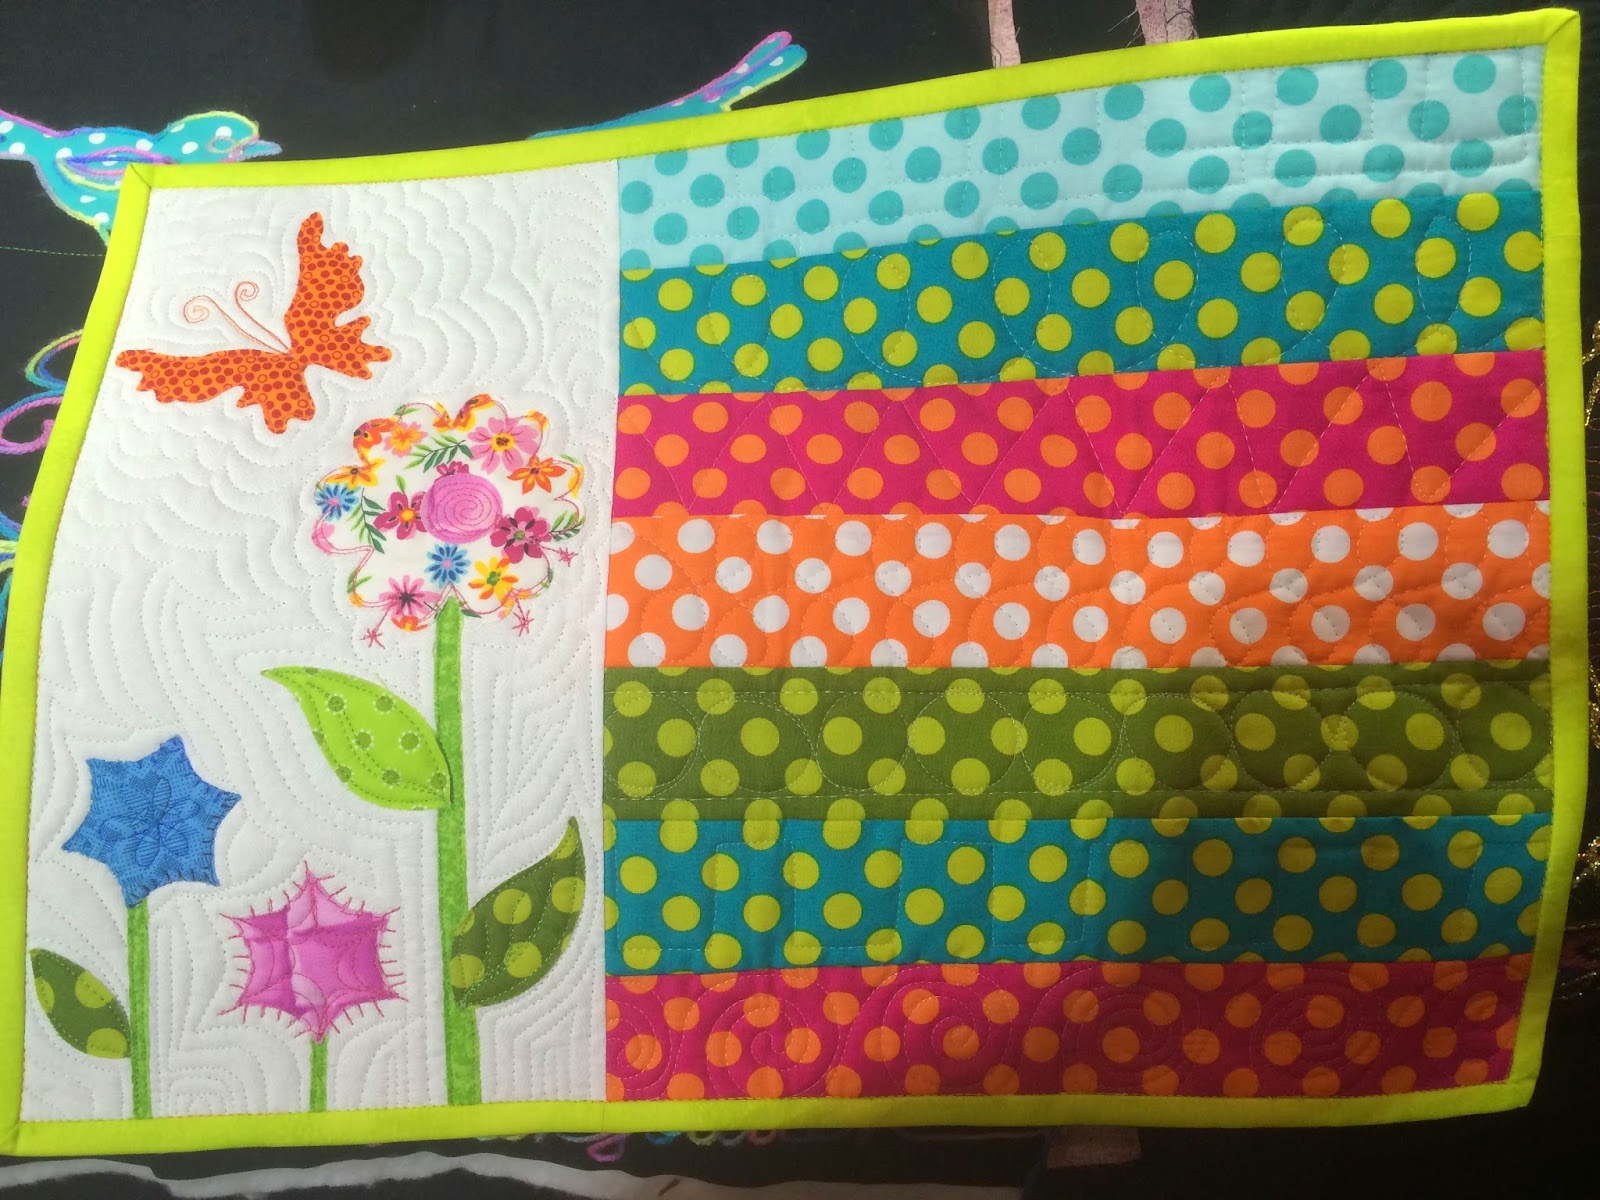
This week for Sweet Sixteen Sunday I wanted to show you how to use the 'HQ Straight edge ruler' but I didn't want to work on just another practice piece.
So this week I will show you how to make these cute little placemats.
My kids Love these placemats! They are super quick and easy to make and even have little pockets to store your cutlery.
These are perfect for everyday or for a special picnic. What I love most about these though is I made them entirely on my HQ Sweet Sixteen!
They're made from one of my gorgeous friends Tammie Greens fabric collections! I love Tammies fabrics, check out Buddies Corner and Studio T Green for more of her collections :)
Grab a cuppa and I hope you enjoy this weeks HQ Sweet Sixteen Sunday Post :)
This weeks Sweet Sixteen Sunday post is a bit different, I wanted to mix things up a little and share with you some of the inspiring videos that I watch over and over when I'm lacking in motivation.
First up is a very talented long arm quilter Lyn Durbin. Lyn has a huge amount of videos on her YouTube channel, click here to see them all. This has to be my favourite though, the Loopy Clams design.
This next video is just crazy good!! This is Karleen Porter quilting on her Sweet Sixteen. The designs she comes up with are just so inspiring!
Here is her other Sweet Speed Quilting video. Can you believe that these are all done free hand!
I couldn't have an 'Inspiration' post without including my favourite quilter of all time! Angela Walters is an incredible quilter and I am so inspired by her. I have bought all her books and taken all her Craftsy classes. I just can't get enough of her techniques and teaching style.
If you want to see more from Angela Walters, head over to Craftsy. I highly recommend her Feathers class and her Small Changes, Big Variety Class.
Full disclosure: I do receive a small commission if you sign up to one of these classes, however I have paid with my own money to take these and many more Craftsy classes and I would never recommend something I don't truly believe in!
I hope you find these videos as inspiring as I do!
This week Sweet Sixteen Sunday is a little different, I decided I just wanted to play and practice my free motion quilting. I also wanted to test out some new metallic threads that I bought for a special project.
This is what I'm making in this weeks video:
There are 14 different free motion designs in this project. To be honest I had no idea what I was going to quilt from one section to the next, but I knew I wanted to do a different design in each section and I kind of just went with the flow.
I decided to quilt angular (straight line) designs in one section and then swirly designs in the next. It was just so much fun!
I also show you how I transfer the name onto my quilt using a print out from my computer.
Last week I told you all about the new Basting feature on the Upgraded Sweet Sixteen Screen. This week I wanted to show you the new Low Bobbin Feature.
This is an awesome feature that sounds an alarm when you get close to your bobbin running out.
Check out this video for all the details.
If your interested in upgrading your Sweet Sixteen screen, just contact your local Handi Quilter Dealer, or visit the website: www.handiquilter.com.au
I'd love to hear from you! If there is anything you would like me to show you, please leave a comment!!
I have really missed doing these videos over the school holidays, but honestly my house was so noisy with all the kids home that it would have just been a disaster!
Anyway I have some really exciting news to share with you! Handi Quilter have upgraded the screen on the Sweet Sixteen! There is a few really exciting new features and today I wanted to take you through a few of them.
My favourite is the new Basting feature! Grab a cuppa and I hope you enjoy the new features as much as I do.
I have finally found a few quiet minutes in the Storm house to record the video I've been wanting to do for months.
I've been developing my 'Needleturn without the Needleturn' technique for years now and I am amazed at the response I have received! Everyone who has seen a demo at the shows in Sydney and Melbourne have been really positive about this technique and so I am so happy to be able to share this technique with you.
I have several patterns on the way that will use this technique, but you can use this technique with any appliqué pattern at all! And not just appliqué, but paper piecing too! So have a watch and I hope your inspired to give needle turn a go or another go as the case may be ;)
If you would like to buy an Applique Brush, click here to be taken to my website - or why not share the love and ask you favourite Patchwork shop to get them in for you!
Hugs Paula
PS. Drop back tomorrow for an exciting new HQ Sweet Sixteen Sunday!!
As I mentioned last week, I had a fantastic time at the Melbourne Quilt and Craft Show last weekend. My favourite thing was catching up with the girls from Blessington/Handi Quilter.
I learned so much more about my beautiful HQ Sweet Sixteen that I can't wait to share with you.
On todays Sweet Sixteen Sunday post I have the other video that I recorded with Helen Godden. I asked Helen to show us how she quilts her Swirls/Spirals and also how to quilt them in a more contemporary style.
I hope you enjoy the video and drop by the Facebook page for the chance to win one of Helens awesome DVD's 'Free Motion Quilting for beginners by Helen Godden'. I had a watch of it last night and trust me, it is fantastic!! I learned so much, plus she cracks me up!! I won't be able to look at a picture of Hugh Jackman the same way again. lol
I had a fantastic time at the Melbourne Quilt and Craft show this past weekend.I took some pictures of my favourite quilts so I'll share those with you soon.
It was so great to catch up with so many of my Quilty Facebook friends as well as all the stall holders that I only get to see on the show circuit.
One of my favourite stands is always the Handi Quilter and Husqvarna Viking stands. I love catching up with Narelle and the girls and getting lots of new ideas to share with you.
This placemat is made by Narelle from Handi Quilter. She is such a lovely person and I always learn so much just from having a chat with her. This placemat was made entirely on the Handi Quilter Sweet Sixteen! Yes even the piecing!
The appliqué was fused onto the background and then raw edge quilted. Even the blanket stitch was done on the Sweet!
I think this flower was my favourite. How cute is it!!
You can do so much with the Sweet Sixteen, I even learnt how to baste a quilt, I will be sharing that technique with you soon, so make sure you subscribe to the YouTube channel for more videos.
This was my other favourite thing that I learned at the Handi Quilter Stand! This is the brand new Yarn Couching foot. Helen Godden was on the stand and she was showing us how to use this new foot. This small quilt is just so so cute! Yarn couching is a ridiculous amount of fun!
A ball of yarn and few appliqué shapes and look at this gorgeous little wallhanging! It would look so cute on my girls bedroom wall.
Some more Yarn Couching Eye Candy!
And the gorgeous Helen Godden, she cracks me up!!
Today, I am so excited to share with you a video I recorded with Helen Godden. She is one amazing quilter and a lovely, funny and cheeky lady.
I asked her to share with us how she quilts with the new yarn couching foot on the HQ Sweet Sixteen.
I hope you enjoy :)
Hugs Paula
PS. I am so excited to have one of Helen's Free Motion Quilting DVDs to give away to one lucky reader this weekend, so make sure you check back on Sunday for that and a new HQ Sweet Sixteen Sunday video tutorial!
Swirls have been one of those designs that I really struggled with... I just couldn't get them to look good, so I gave up and moved onto something else.
But lots and lots of drawing I think I have finally worked it out.
I put together this video to show you how I draw swirls. I'll put up a video as soon as I can to show you how I quilt them on my Handi Quilter Sweet Sixteen. :)
I'd love to see some pictures if you give this a go, or if you need any help or want me to show you a particular technique, please send me an email... paula.storm@gmail.com or drop by the Facebook page for lots of inspiration! https://www.facebook.com/sewlittlefabricbyPaulaStormDesigns
On Last weeks 'HQ Sweet Sixteen Sunday' I showed you how I draw out free form feathers on paper for practice. Here it is again if you want a quick refresh.
This week I wanted to show you how I actually stitch them out on my Handi Quilter Sweet Sixteen.
Edit: Because of the Queens Birthday long weekend and the amount of visitors and tourists in our town, I had a lot of trouble uploading this video, I had to drop the quality down really low just to get it to upload. I have tried to get the better quality video up ever since, so here it is in HD, hopefully you can actually see what I'm doing now :)
I would love to hear if you have had a go at this! Send me some pictures :)
I have recently worked out how to quilt feathers. I can't tell you how excited I was when it finally clicked.
Being a busy mum to 4 young children I just don't get as much time as I would like to sit down and practice quilting on my machine. Thats why I decided to try and practice drawing my quilting designs.
I usually have a good hour at night when I'm sitting in front of the TV (keeping hubby company), I find this time in front of the 'box' a bit of a waste because I really could be doing something... useful. So the other night I pulled out some A4 sheets of paper and a pencil and started practicing.
It only took a few nights and finally the shape of the feather just clicked, it's hard to explain, but a few other friends have said the same thing. All of a sudden you just get it.... After that the actual quilting is so much easier!
This was my very first attempt at free form feathers on a project, after just 3 or 4 nights of practicing on paper.
Applique design by Kellie Wulfsohn of 'Don't Look Know'
I had this cushion top sitting in my UFO pile for at least a year, so I thought I would put it to use and practice some free form feathers. Its not perfect, but ohh my goodness I can't tell you how happy it makes me to look at the quilting and being able to say 'I did that!'
If your interested in having a go, I have put together a video on how I draw my feathers.
I'd love you to come back next 'HQ Sweet Sixteen Sunday' when I will stitch out the feathers for you.
I'm so happy to announce that I have teamed up with Handi Quilter Australia as an Ambassador for the HQ Sweet Sixteen. Yeah!!
I'm so excited about this as I have been a huge fan of the Sweet Sixteen for years. I am so happy to be able to bring you lots of hints and tips to make the most of your machine or maybe entice you to buy one ;) This is the first in my new weekly 'Sweet Sixteen Sunday' posts.
I'm beginning my 'Sweet Sixteen Sunday's' with a blog post all about using the Chalk Pounce to help with your Quilting.
I'm finishing off a quilt at the moment that has lots of open space. This quilt is a perfect candidate to use plastic templates as it is a block based quilt that repeats over the whole quilt. I have chosen 2 different templates but both are based on the 'feather' design.
To start with, you will need a chalk pounce. I'm sure there is a few different brands around, but I have only used this one. I have a total of 3 pounces, I tend to go a bit overboard with gadgets :) I have a White, Pink and Blue chalk pounce pad. I can't remember where I got all of mine from, but if you google 'Chalk Pounce' there is a heap of options that come up.
The chalk pounce is basically like the old blackboard dusters we used to use at school, remember how we used to have to take them outside of class and bang them together until the chalk all came out... The pounce pad is the same thing except there is a reservoir inside that holds the powdered chalk and slowly feeds it through the 'duster'.
The white is probably my favourite as the chalk can be removed by simply ironing your piece and the chalk will disappear. I did try the Pink chalk on this quilt, but I had a lot of trouble seeing the chalk on my off-white fabric. The fabric I was using has a weird paint like stripe to the design and so I think the chalk was sitting on top of the fabric rather than settling in.... The blue however was perfect, it was easy to see and stayed in place without brushing off. Ultimately that same feature has become a bit of a problem as I'm having trouble removing the blue chalk.
In this case that is not a problem as I planned on washing the quilt anyway, so I don't mind having to wash it to remove the blue chalk, but if you are working on a piece that couldn't be washed, I would probably not use the pink or blue chalks.
Onto the stencils. As I said, I have used 2 different stencils on this quilt. One for the very middle of each block and one for the 'sashing'. I have also ditch stitched every single seam on the quilt. Stencils are hard to find... I have seen some online on eBay, or I highly recommend asking your Local Quilt Shop if they can order some in for you. They may have a booklet that you can order from.
I think ditch stitching is essential to get your quilt to lay nice and flat, so my first job is always to ditch every single seam. I spray baste my quilts so I don't use pins, but if you do use pins, you should also be able to remove them after ditch stitching to make free motion quilting much more fun.
Once the ditching is complete, you can lay your stencil into position. To apply the chalk, I leave the cover on the pounce and give it a tap on the table. This helps to feed the chalk through the pounce. You then gently swipe the pounce over the stencil 1 or 2 times. It often looks like the chalk isn't working, but after 2 swipes, lift up a corner of the stencil and you will be able to see if you need to continue or whether you have past enough chalk through the stencil.
There is a few other options if you don't want to use the chalk. For example you can use a water soluble pen or ceramic pencil and trace the design onto the quilt top. Someone asked if I like Frixion pens to mark my quilting. To be honest I don't like the frixion pens for marking my quilts. I have used them quite a lot and on some fabrics the line doesn't completely disappear, it sometimes turns a funny yellow colour. I have also had the ink from a Frixion pen return even after I thought it had completely gone away. A friend of mine recently used a red friction pen to mark her quilting lines on a white background and the ink actually stained her white thread a pink shade. So even after ironing, her quilt looks like it had been quilted with pink thread.... Personally I won't use the Frixion pens for marking my quilting lines anymore, but if it works for you... Go for it! :)
To be honest, the chalk pounce method is not my favourite way to mark a quilt, but it is definitely the quickest and is fantastic if you are lacking in confidence or have trouble deciding on quilting designs. In future blog posts I will take you through a few of my favourites, or check out my book ;)
For the actual quilting, I used my Sweet Sixteen and I had the whole quilt completely finished in 2 afternoons. The machine makes life so much easier. One of the things I like most about the Sweet Sixteen is the table. The table is so slick and smooth that the project you are working on just glides across the table.
When I first tried free motion quilting on my old domestic machine I thought it was just me and that I could just not do it... I had trouble getting the quilt (no matter how small it was) to move smoothly under the needle. This caused the quilting lines to be jagged and shapes were never smooth. Not to mention the stitch length...
Then I watched a few crafts classes, and sat down at a HQ Sweet Sixteen. Instantly my quilting was better! My stitch length was so much more consistent, my movements were smoother and the machine is at the perfect height, so I didn't get as sore, even after a big session :)
I found that my old machine surface was quite 'sticky'... well I guess sticky is not the right word, but the machine kind of grabbed hold of the quilt and wouldn't let it pass smoothly over the bed of the machine. So if you get a chance to try out a HQ Sweet Sixteen, I would definitely recommend it! It might not be you after all!
You can find your closest dealer at http://www.handiquilter.com.au
I have made a video to show you the whole process, so grab a cuppa and have a look at how I quilt using the HQ Sweet Sixteen and stencils.


.jpg)

.jpg)

.jpg)